Many gardeners dream of a low-maintenance flower that brings color, attracts butterflies, and shrugs off drought. The coneflower delivers on all these promises and more. Yet even this tough native perennial has its quirks. Understanding a few key secrets can mean the difference between a so-so patch and a spectacular display that lasts for years.
Why Location Matters More Than You Think
Coneflowers have a reputation for being easygoing, and they are. But they do have one non-negotiable demand: sunlight. If you get this single factor right, about 80% of the hard work is done.
The Full Sun Rule
These plants require a minimum of six to eight hours of direct sunlight each day. Less than that, and you will notice the stems stretching thin and weak. The plant may flop over rather than standing upright. Worse, shaded conditions invite fungal diseases like powdery mildew. A spot that bakes in the afternoon sun is ideal. Even a location that gets morning sun only is not enough. Pick the sunniest corner of your yard, and your coneflowers will reward you with sturdy stems and abundant blooms.
Soil That Drains
Coneflowers are native to prairies and open meadows. These environments do not stay soggy. The roots of a coneflower will rot if they sit in waterlogged soil for more than a day or two. Good drainage is the second secret. If your garden has heavy clay that holds water, consider building a raised bed or amending the soil with coarse sand and compost. A simple test is to dig a hole, fill it with water, and check if it drains within a few hours. If water still sits there the next morning, you need to improve drainage before planting.
How to Plant Coneflower for Maximum Success
The timing and technique of planting set the stage for the entire life of the plant. Rushing this step is a common mistake among beginners.
Spring vs. Early Fall
The best windows for planting are spring, after the last frost, or early fall, at least six weeks before the first hard freeze. Spring planting gives the roots a full growing season to establish before winter. Fall planting works well too, as the cooler temperatures reduce stress on the transplant. Avoid planting in the heat of midsummer unless you are prepared to water daily for several weeks.
Spacing and Depth
Space your plants 1 to 3 feet apart, depending on the mature width of the variety. Dwarf cultivars can go closer together, while tall types like Echinacea purpurea need more breathing room. Crowded plants do not get enough airflow, which invites mildew. When digging the hole, make it twice as wide as the nursery pot but no deeper. Set the plant so the top of the root ball sits level with the surrounding soil. Backfill with the same soil you removed — no fancy potting mix needed. Water thoroughly after planting, and keep the soil moist for the first week to help the roots settle.
Coneflower Care Tips: Light, Water, and Feeding
Once your plants are in the ground, the daily care routine is refreshingly simple. Coneflowers are not needy, but they do have preferences.
Watering Wisdom
Established growing coneflower plants are remarkably drought tolerant. They can survive weeks without rain. However, they bloom more profusely when they receive about an inch of water per week during the growing season. The trick is to water deeply but infrequently. A long, slow soak once a week encourages roots to grow deep into the soil. Shallow, frequent watering creates weak roots that stay near the surface. If you see the lower leaves wilting on a hot afternoon, that is a sign to water. But always let the soil dry out between waterings.
Fertilizer: Less Is More
This is where many gardeners overdo it. Coneflowers are native to lean prairie soils. They do not need rich, heavily fertilized ground. Too much nitrogen produces lush, green leaves but weak, floppy stems and fewer flowers. A single application of compost around the base of each plant in early spring is plenty. If you want to give them a boost, use a slow-release fertilizer with a low first number (nitrogen), such as a 5-10-5 formula. Apply it once at the start of the season, then stop.
Temperature and Humidity Considerations
Coneflowers are hardy in USDA zones 3 through 9. They handle subzero winters and scorching summers with equal grace. But high humidity is their weak spot. If you live in a region with muggy summers, space your plants generously and avoid overhead watering. Water at the base of the plant instead. This simple habit dramatically reduces the risk of powdery mildew and other fungal issues.
Pruning and Deadheading for Continuous Blooms
Pruning is not strictly necessary for the plant’s survival, but it changes the bloom cycle dramatically. Understanding when to cut and when to leave things alone is a secret that experienced gardeners use.
Deadheading for More Flowers
Once a flower fades, the plant directs energy toward seed production. If you snip off the spent bloom just above the next set of leaves, the plant responds by sending up new flower stalks. This technique, called deadheading, can extend the blooming period from midsummer well into October. Use clean, sharp pruners and cut at a 45-degree angle. Be consistent about it. A ten-minute walk through the garden every few days during peak bloom keeps the flowers coming.
Leave the Seed Heads for Winter
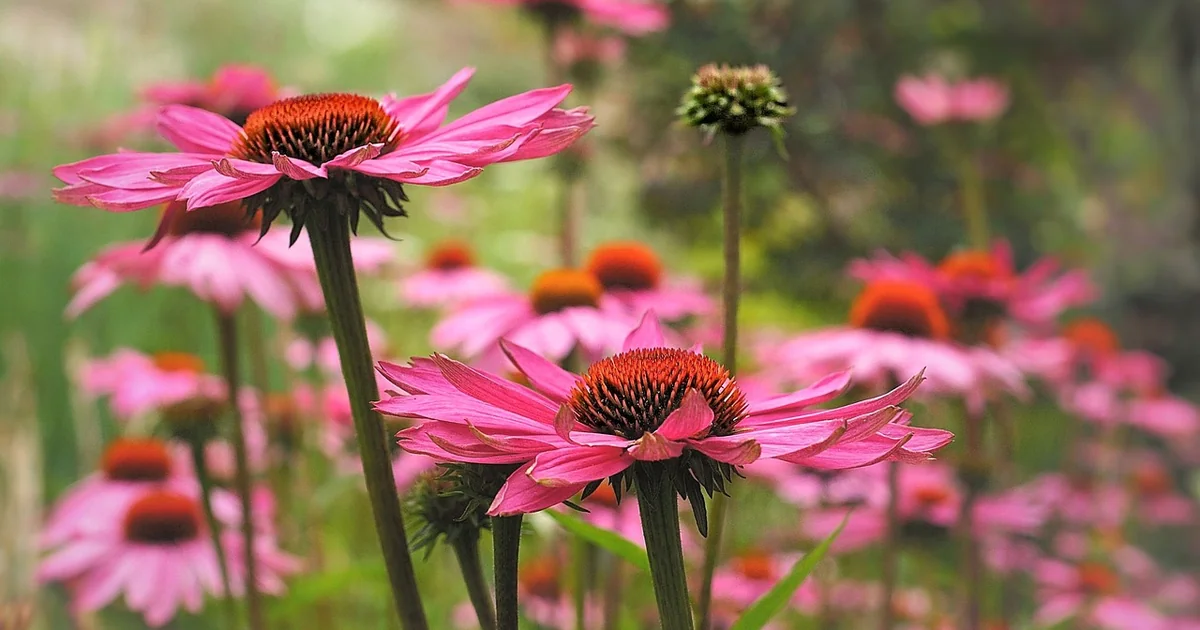
Come autumn, stop deadheading. The dried seed heads are a vital food source for birds, especially goldfinches. The black, cone-shaped centers also add visual interest to the winter garden. When snow dusts the tops of the dried stems, they look like natural sculptures. Leave them standing until early spring, then cut them back to about 6 inches tall before new growth emerges.
Pests and Diseases: What to Watch For
Even tough plants have enemies. Coneflowers face a few specific threats that can be managed with simple strategies.
Powdery Mildew
This fungal disease appears as a white, powdery coating on the leaves. It rarely kills the plant but makes it look ugly and weakens it over time. The best prevention is good airflow. Space plants properly and thin out crowded clumps in spring. If mildew appears, remove the affected leaves and dispose of them in the trash, not the compost pile. A homemade spray of one part milk to nine parts water applied weekly can help control mild cases.
You may also enjoy reading: BHG Walmart Quilt Sold Out: 5 Tips to Snag It.
Aster Yellows
This is a more serious problem. Aster yellows is caused by a phytoplasma, a tiny organism spread by leafhoppers. Infected plants produce distorted, greenish flowers that look like little brooms. The stems may turn yellow and stunted. There is no cure. The only solution is to dig up and discard the entire plant immediately. Do not compost it. Aster yellows can spread to other plants in the aster family, including daisies and sunflowers.
Common Pests
Aphids sometimes cluster on new growth. A strong blast of water from the hose knocks them off. Japanese beetles may chew holes in the petals during summer. Hand-picking them in the morning, when they are sluggish, is effective. Coneflowers are naturally deer resistant, which is a major advantage for gardeners in areas with heavy deer pressure.
Potting and Repotting Coneflower
Coneflowers adapt well to container life, but the rules change slightly. Containers dry out faster and heat up more than garden soil.
Choosing the Right Pot
Select a container at least 12 inches in diameter with drainage holes. Terracotta pots work well because they breathe and help prevent overwatering. Fill the pot with a high-quality potting mix, not garden soil. Garden soil compacts in containers and suffocates roots.
Container Care Differences
Potted coneflowers need more frequent watering than in-ground plants. Check the soil every day during hot weather. Stick your finger an inch into the soil. If it feels dry, water until it runs out the bottom. Apply a half-strength liquid fertilizer every four to six weeks during the growing season, because nutrients wash out of pots faster. Repot every two to three years in early spring, moving to a slightly larger container and refreshing the potting mix.
Propagation: Growing More Coneflowers for Free
Once you have a healthy patch, you can multiply it without spending a dime. Two reliable methods exist.
Division
Every three to four years, dig up a mature clump in early spring or fall. Use a sharp spade to cut the root ball into sections, each with several shoots and a healthy root system. Replant the divisions immediately at the same depth. This method rejuvenates older plants that have become woody in the center.
Seed Saving
Collect seeds from dried flower heads in late autumn. Store them in a paper envelope in a cool, dark place. Start seeds indoors six to eight weeks before the last frost. Press them lightly into moist seed-starting mix, but do not cover them. They need light to germinate. Keep the tray at about 70 degrees Fahrenheit, and seedlings should appear in two to three weeks. Note that seeds from hybrid cultivars may not produce flowers identical to the parent plant. For true-to-type plants, stick with species like Echinacea purpurea.
Companion Planting Ideas
Coneflowers look best when paired with plants that share their sun and soil preferences. The right companions also help deter pests and extend the season of interest.
Grasses and Late Bloomers
Ornamental grasses like little bluestem or switchgrass create a natural prairie look. Their fine texture contrasts beautifully with the bold coneflower heads. Black-eyed Susans, coreopsis, and sedum also thrive in similar conditions and bloom at the same time. The combination of purple coneflowers with golden yellow black-eyed Susans is a classic that never fails.
Avoid Tall Competitors
Do not plant coneflowers next to tall, aggressive growers like sunflowers or Joe Pye weed. These plants will shade out the coneflowers and compete for water. Keep the neighbors shorter than the coneflowers to ensure every plant gets its share of sunlight.